


Centralising Repetitive Parameters with Event Settings Variables in Google Tag Manager
With analytics projects, especially as these become larger/more comprehensive, we oftentimes find ourselves tracking multiple actions that have the same parameters. This repetition can lead to maintenance headaches and inconsistencies if we’re not careful. Thankfully, Google Tag Manager (GTM) offers a solution through “Event Settings Variables”, which can help streamline parameter management and make our tracking implementations more organised and efficient.


What is a Parameter?
In Google Analytics, parameters are additional pieces of information that provide context and details about user actions or “events” on a website or app. They are essentially key-value pairs attached to these events, with the “key” representing the parameter’s name and the “value” holding the specific data associated with that parameter. Parameters offer deeper insights into user behaviour by capturing specific details about events. For example, when a user clicks an element on your site such as; links, navigation menu items, CTAs, social media sharing buttons, filters etc., you might want to track parameters like:
- click_url: The full URL of the clicked link, providing information about the destination page.
- click_text: The anchor text of the link, indicating what the user clicked on.
- click_id: A unique identifier for the link, useful for tracking specific elements.
- click_class: The CSS class of the link, which can be used to categorise links (e.g., “navigation”, “button”, “external”).
Step 1: Add your parameters as custom definitions in GA4.
Step 2: Ensure your parameters are configured as variables in Google Tag Manager. We have a guide on how to do this here!
Step 3: Set up your tag. Here, we are using “Clicks to Email” (when a user clicks to an email link on your site) as an example, we wont go through setting up the tag here.

Step 4: In the “Event Parameters” section. Under “Event Settings Variable”, select “New Variable”.
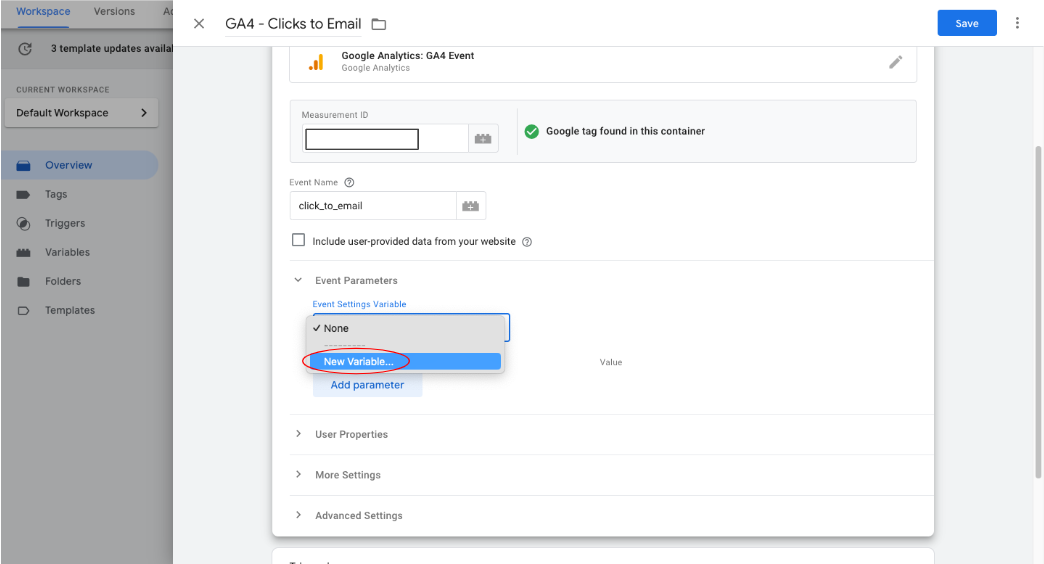
Step 5: Rename the Variable and enter the name of the first parameter you want to track. Here we’re going to start with “click_url”.
NOTE: GTM and GA4 have some technical requirements for how parameters should be named:
Case-sensitive: parameter_name is different from Parameter_name. Consistency is key.
Allowed characters: Use only letters, numbers, and underscores. No spaces or special characters (except for underscores).
Start with a letter: Parameter names must begin with a letter.
Length limits: GA4 has limits on the length of parameter names and values (typically 100 characters).

Step 6: Click the “+” button to add the value to your parameter.

Step 7: Select the appropriate value.
NOTE: The parameter values will only appear in the drop down once you have configured your parameters as variables in Tag Manager.

Step 8: (a) Repeat this for every parameter until you have added them all. (b) Now, your parameters will be added to your tag under the “Event Settings” variable. To double check the details of your parameters you can click the “Show inherited parameters” button. This will show the details as below in image (c). When you’re happy with how this looks, click “Save”.
(a)

(b)

(c)

Step 9: Now, you can add the trigger to your tag and you’re ready to collect your data!

Re-using your new “Event Settings” Parameter
Step 10: Now the Event Settings Variable has been set up, it can be used to capture the same parameters across all relevant tags – “click” tags in this case. To do this, when you are setting up your tag, simply click “Event Parameters” and select your parameter variable from the drop down menu.

Want to Learn More About Google Tag Manager?
For more on Google Tag Manager, check out our blog on FBCLID (Facebook’s Click Identifier) and how it impacts GA4 data or How to Add a Google Ads Conversion Linker tag. If you have any questions or there’s anything else we can help with on Google Tag Manager, please leave a comment below, or email [email protected].
You can also stay up-to-date by following GlowMetrics on Twitter or LinkedIn or by subscribing to our newsletter (link below) for the latest tips and news in the world of digital analytics and marketing.
Don’t forget to sign up for a FREE account on our Resource Hub to access a wealth of valuable resources, including exclusive Google Tag Manager how-to videos and insights!

Posted by
Georgia Sloan
Georgia is a Digital Analytics Assistant who has recently joined GlowMetrics. She works on assisting with projects across Google Analytics and Data Studio, creating data dashboards and social.
Read more from Georgia SloanBrowse by Category
- Social Media
- SEM
- SEO
- Google Ads
Digital Marketing
- Google Analytics
- Google Tag Manager
- Google Opimize
Digital Analytics

Optimise your website and marketing campaign performance with Ireland’s leading digital analytics agency
Sign up to our newsletterEnjoyed reading this article? Find more like it below…

Posted by
GlowMetrics Staff
May 12th 2016
2 min read
GlowMetrics Awarded Google Analytics Certified Partner Status
We've some great news to share with you today, we have just been awarded Google Analytics certified partner status. Being a certified partner, we will be given insights into the...


Posted by
Hannah Magorrian
Feb 29th 2024
Digital Analytics Insights
3 min read
Creating Custom Groups in Looker Studio
If you are a seasoned Looker Studio user, you are probably already familiar with creating custom groups in your data using calculated fields and CASE statements - but did you...
Posted by
Georgia Sloan
Oct 29th 2024
Google Tag Manager
3 min read
Configuring Built-In Variables in Google Tag Manager
What are Built-In Variables? Built-in variables are pre-defined functions within GTM that automatically capture common information around website interactions. These variables act as placeholders for dynamic values, such as clicked...
Leave a Reply